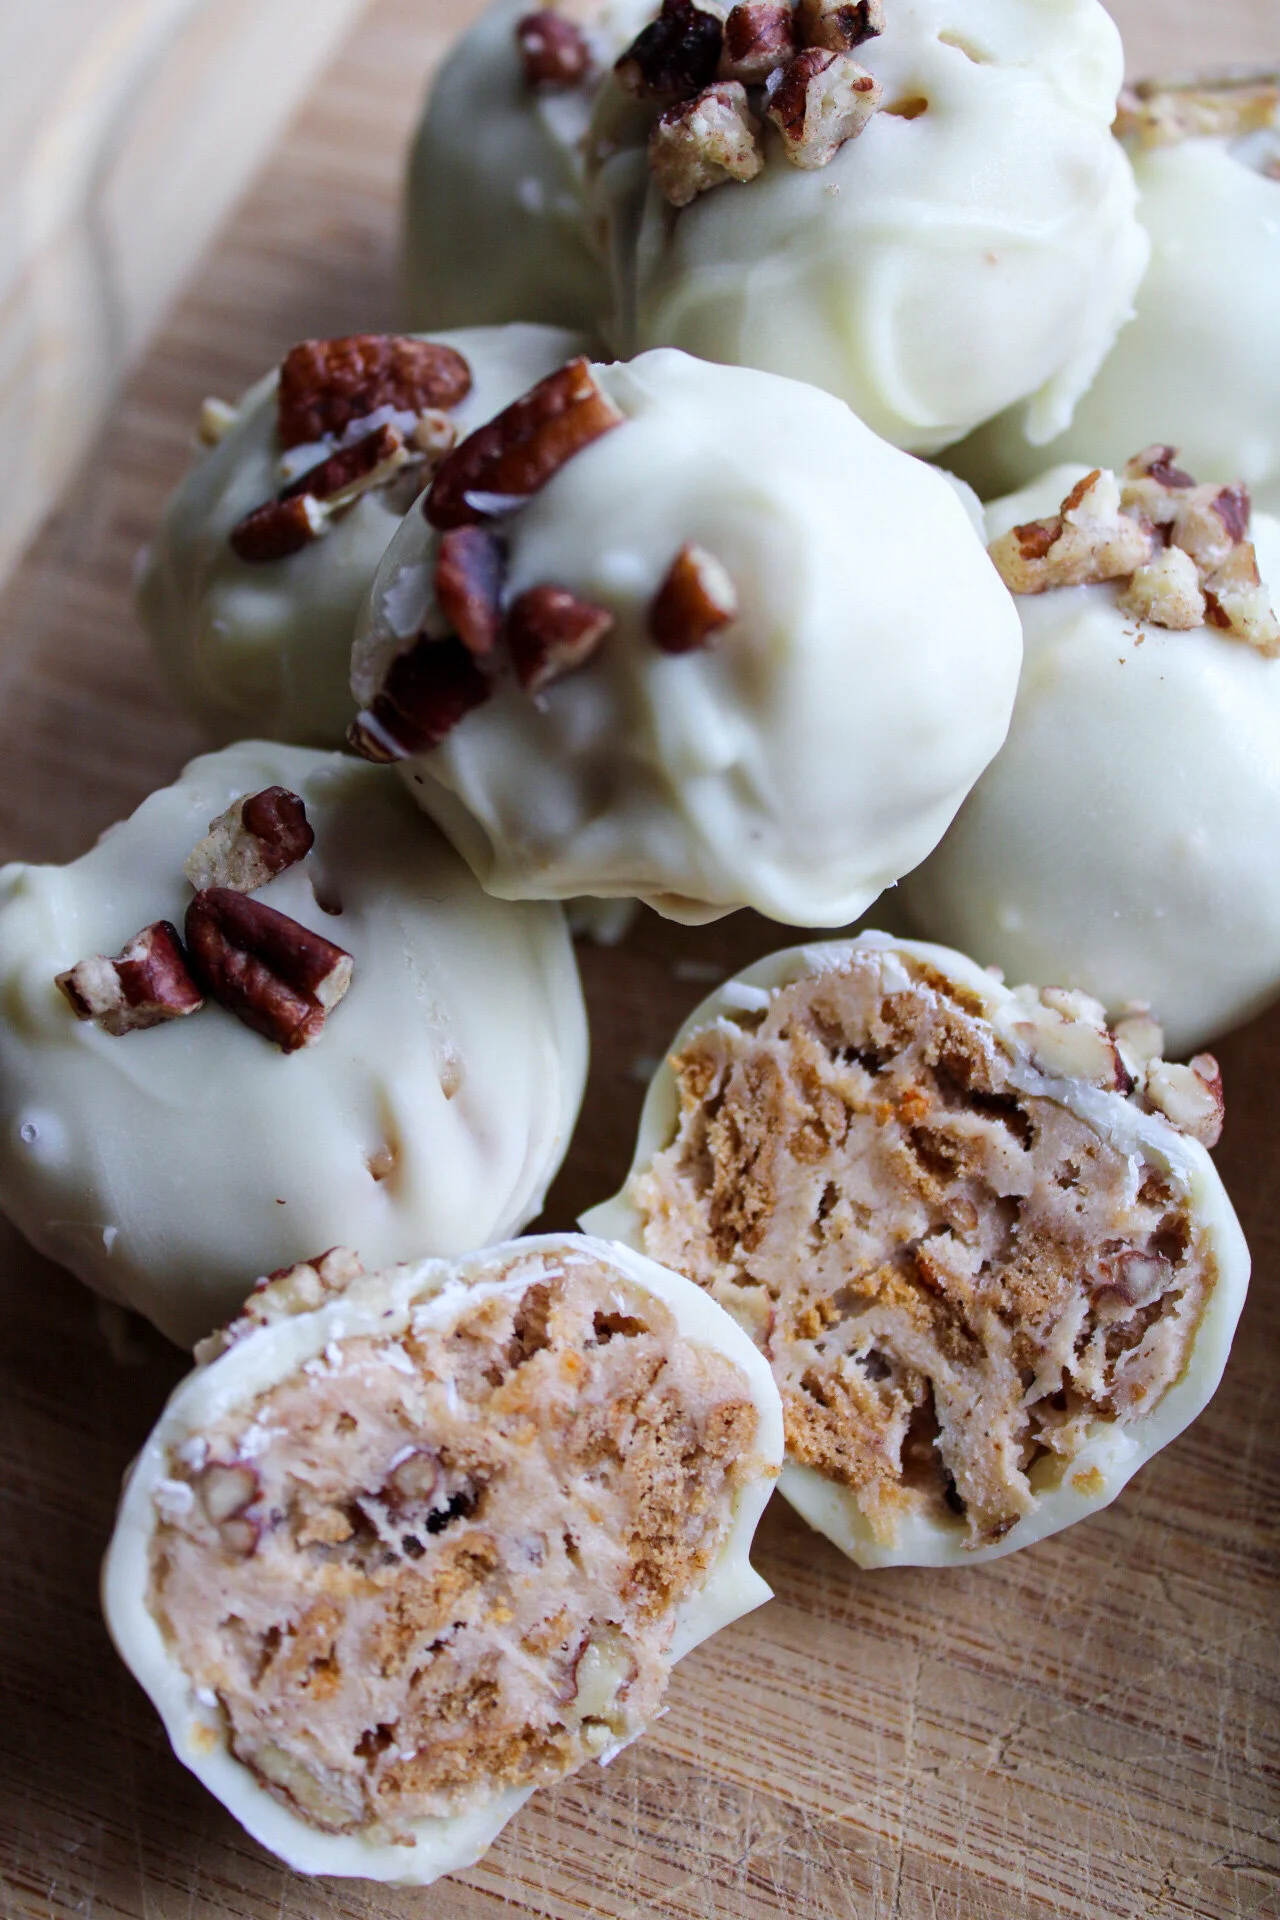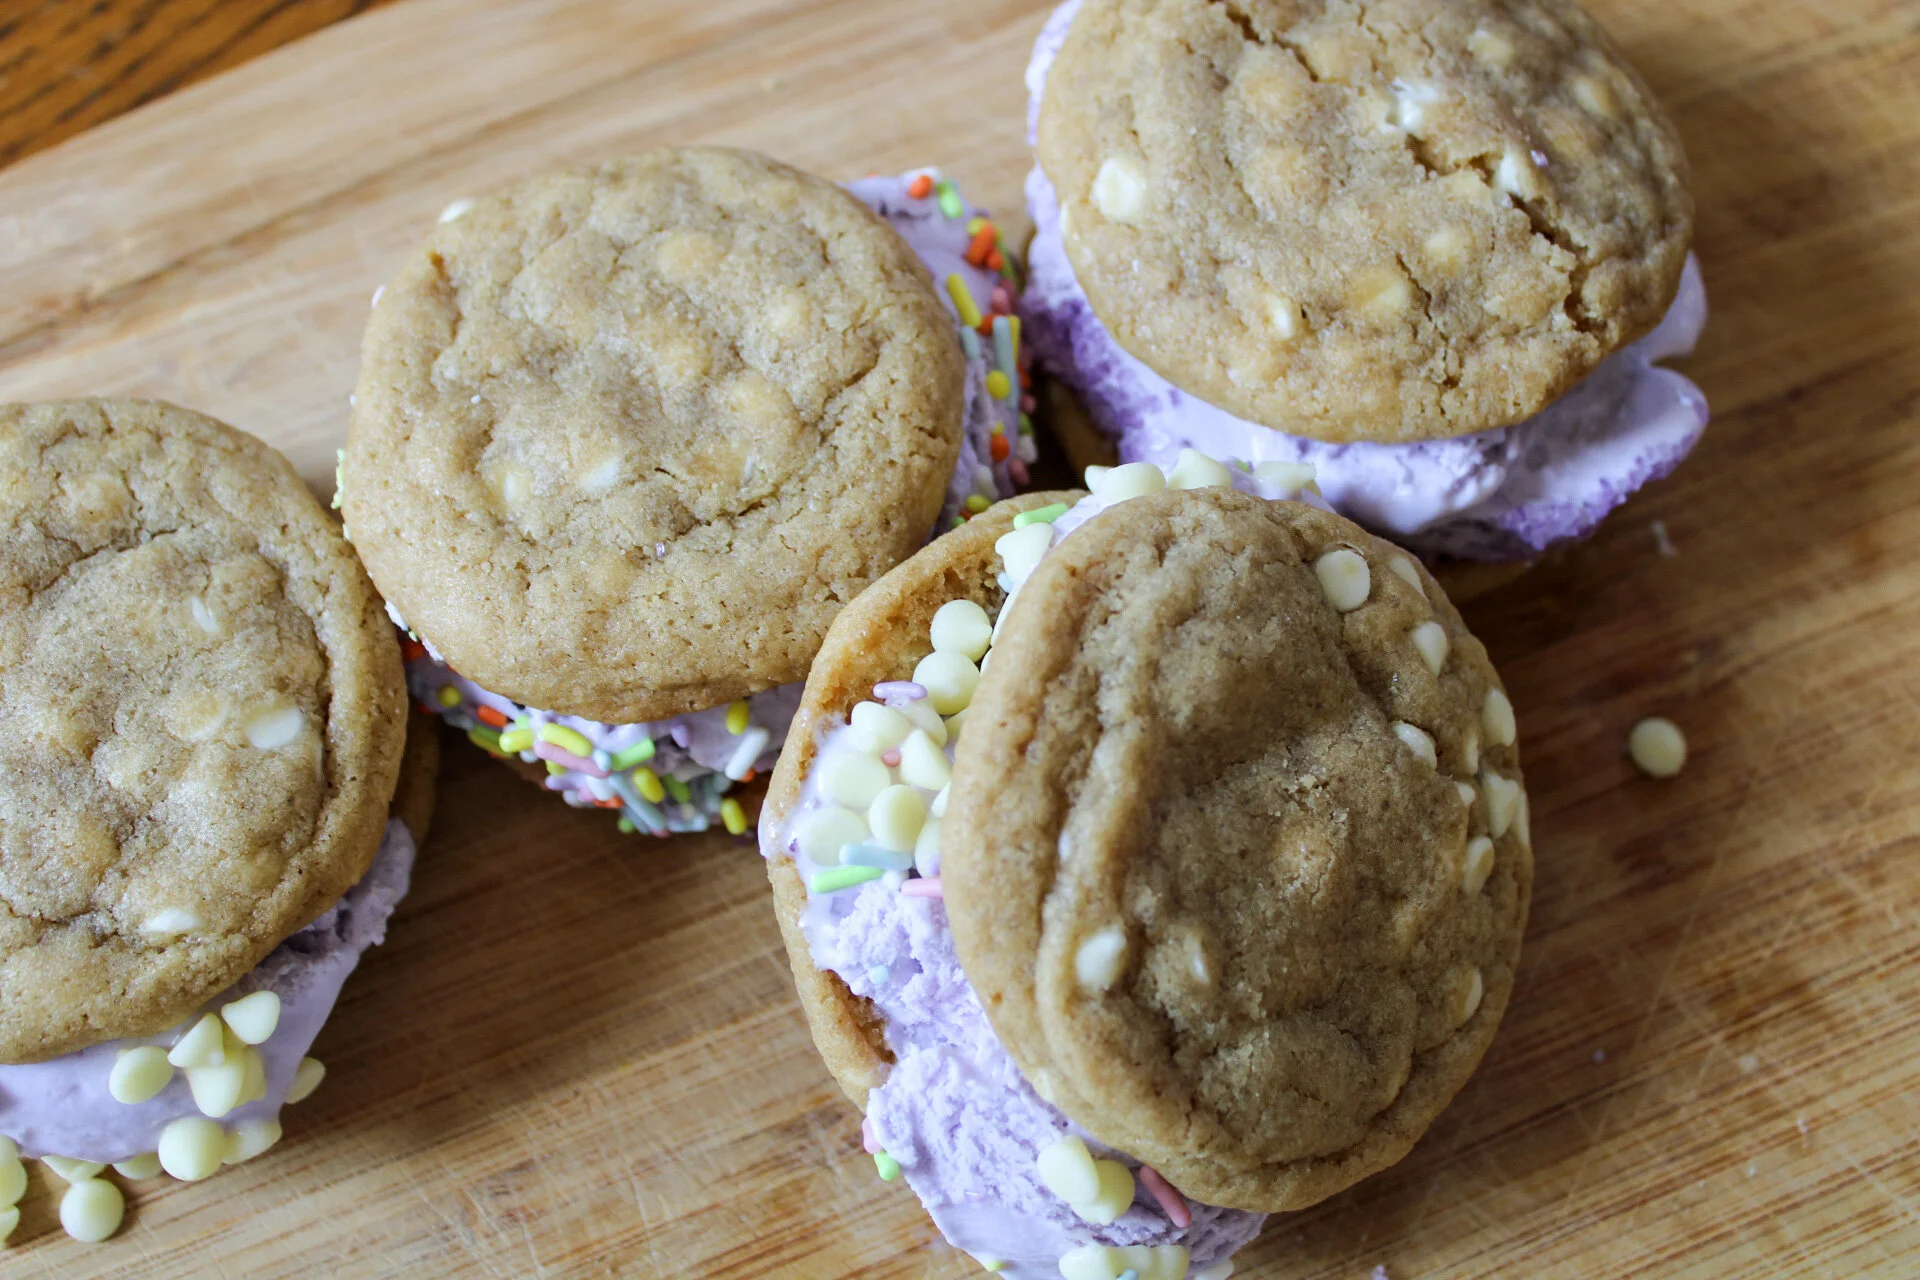
White Chocolate Taro Chipwich
White Chocolate Taro Chipwiches
Are these “unprecedented times” bringing on intense cases of nostalgia, or is it just me? I am already anticipating that my 2020 Spotify year in review playlist will consist of only songs pre-2006, and that my cabinets will be cluttered with cereal, sprinkles and Little Debbie snack cakes. And while these things are mildly embarrassing, I know that one good thing will have come from it: these white chocolate taro chipwiches.
Growing up, I was not a chipwich child. When the ice cream truck rolled into the neighborhood, you could find me slurping up the already-melted Spongebob Popsicle (with the gumball eyes; you know the one.) It wasn’t until I worked at a sleep-away my freshmen year of college that I finally appreciated and craved these delicious treats.
I came across a big tub of taro ice cream at the Filipino grocery store last week and knew I had to make something with it. And what better way to use a tub of ice cream than to make chipwiches? This twist on the ice cream truck classic is indulgent, vibrant in color, and will make you question why the American ice cream biz hasn’t capitalized on this flavor combination yet!
What is taro?
Despite opting for taro-flavored anything when it is available, taro has always been a mystery to me. Most popular in Southeast Asian cuisine, this delectable root vegetable has a very similar consistency to a sweet potato. It has a nutty and sweet flavor that makes it perfect for desserts. My favorite part? It’s purple! I used the Magnolia Ice Cream brand that I found at the Filipino Grocery store (Seafood City for all you Chicago/suburban folk.) I recommend using this brand because they sell flavors like taro and ube in a tub, rather than a smaller pint.
If taro ice cream is inaccessible to you, ube flavored ice cream is also a great option for these chipwiches. Also purple in color, ube is a type of yam that is native to the Philippines. Rising in popularity, they have even started sell ube ice cream at Trader Joe’s!
![IMG_0071[1].JPG](https://images.squarespace-cdn.com/content/v1/5d9de9425fb2f51bf3b90f09/1598622858718-4BFCULDOW3E0Y1BKIGIZ/IMG_0071%5B1%5D.JPG)
To freeze or not to freeze your cookies…
A lot of the chipwich recipes I’ve come across require you to freeze your cookies after they’ve come to room temp. I tried that with these, and all the textures seemed off. Therefore, this recipe is saying NO to freezing your cookies pre-assembly time. So that means you have to cool, and I mean realllyyyy cool, your cookies before assembling. Trust me, I know it is the ultimate temptation to either assemble while they are still warm or just flat out start eating the cookies (guilty.) But patience is the ultimate virtue here to guarantee soft, gooey cookies.
![IMG_0066[1].JPG](https://images.squarespace-cdn.com/content/v1/5d9de9425fb2f51bf3b90f09/1598623380097-00E3JCJ7I2BDSUUEFAI3/IMG_0066%5B1%5D.JPG)
Let’s get to it!
Whether you are bringing these to a Labor Day picnic or freezing a batch for your own after-dinner treat, these chipwiches are a fun and easy way to cool down and experiment with a classic Filipino flavor. Let me know what you think in the comments and enjoy!
![IMG_0077[1].JPG](https://images.squarespace-cdn.com/content/v1/5d9de9425fb2f51bf3b90f09/1598622905404-6U1BIZL81SCX9DZYV8F0/IMG_0077%5B1%5D.JPG)
White Chocolate Taro Chipwiches
Makes: 8 chipwiches
Prep time: 15 minutes
Cook time: 12 minutes
Cool/assemble time: 2 hours
Total time: ~2.5 hours
Ingredients
White Chocolate Chip Cookies
1 1/4 cups of all purpose flour
1/2 tsp of baking soda
1/2 teaspoon of salt
*7 tablespoons of unsalted butter, room temperature
3/4 cup of brown sugar
2 tbsp of granulated sugar
1 egg
1 tsp of vanilla
1 cup of white chocolate chips
Chipwiches
White chocolate chip cookies
2 cups of taro or ube ice cream (1/4 cup serving per chipwich)
White chocolate chips, sprinkles, or anything else you would like to decorate with
Instructions
Preheat oven to 350 degrees F. Line a baking sheet with parchment paper (I used my silicon mat) and set aside.
In a medium bowl, whisk together the flour, baking soda and salt.
![IMG_0047[1].JPG](https://images.squarespace-cdn.com/content/v1/5d9de9425fb2f51bf3b90f09/1598620873551-U17GU1FHEB27GP29KYOV/IMG_0047%5B1%5D.JPG)
3. In a large bowl, or a bowl with a stand mixer, beat the butter, brown sugar and granulated sugar on medium speed for about four minutes until the mixture is light anf fluffy.
4. Add the egg and vanilla to the butter mixture and beat until combined, about 20-30 seconds.
![IMG_0050[1].JPG](https://images.squarespace-cdn.com/content/v1/5d9de9425fb2f51bf3b90f09/1598621518582-APZRVP4PZLU501B7Z9IH/IMG_0050%5B1%5D.JPG)
5. Slowly add the flour mixture into the dough. Be careful not to over beat.
6. Gently fold in the chocolate chips by hand, using a rubber spatula or wooden spoon.
![IMG_0057[1].JPG](https://images.squarespace-cdn.com/content/v1/5d9de9425fb2f51bf3b90f09/1598621634247-DV9XE0431TFRACFFLJIN/IMG_0057%5B1%5D.JPG)
7. Scoop out about 1.5 tablespoons of cookie dough, shape into a ball, and place on the baking sheet. Make sure to leave about 1-2 inches of space between each cookie.
8. Bake for about 12 minutes or until the edges of the cookies begin to turn brown.
9. **Cool the cookies to room temperature on the pan. At this point, you could either leave them to completely cool on the pan for about 1.5 hours, or store them in an airtight container for the same amount of time. I’ve tried both and either works great!
![IMG_0067[1].JPG](https://images.squarespace-cdn.com/content/v1/5d9de9425fb2f51bf3b90f09/1598621858678-VFESHSC4Y32JHCMTULBW/IMG_0067%5B1%5D.JPG)
10. Once the cookies are cool enough to work with, use a cookie mold or a 1/4 cup measuring cup to scoop the ice cream onto the flat side of one cookie. Top the flat side of the second cookie to make a sandwich.
11. Place your chocolate chips, sprinkles or whatever other toppings you have into a bowl or onto a plate. Roll the sides of the sandwich into the topping.
12. Serve immediately or wrap tightly in plastic wrap and freeze for up to one month.
Notes
*If your butter is cold and not at room temperature, microwave each side of the stick for five seconds each.
** If you do not have the time to cool for this long, cool for as long as possible and place the cookies in the freezer for 10 minutes before assembly time.
![IMG_0080[1].JPG](https://images.squarespace-cdn.com/content/v1/5d9de9425fb2f51bf3b90f09/1598622657441-LIEWEFIH8D0QT4WVUTA9/IMG_0080%5B1%5D.JPG)
![IMG_0081[1].JPG](https://images.squarespace-cdn.com/content/v1/5d9de9425fb2f51bf3b90f09/1598622700131-BRASM4BDNEMDZG0U9LFB/IMG_0081%5B1%5D.JPG)